Custom Facebook Friends Lists
Facebook is the number one social networking site in the world, helping millions stay in touch with each other every day. If you’re like most people then you have people from all parts of your “world” added as a friend. This includes acquaintances, friends, family, friends of the family, people who you attend your church, co-workers and (dun dun dun) bosses.
Well there are those times where you want to post a funny (but inappropriate) picture, joke or video that your friends would find hilarious but your family not so much. Well there is a way to keep everyone happy without any bickering from anybody using Facebook custom lists.
This guide will show you how to make certain lists for the different people that make up your social network. First, you should think of what lists you want to make. In this example, I will be making a list of my co-workers and showing how you can either just post to that list or even hide an update from the list or lists that you specify.
First, think of the first person you would like to add to that list and go to their profile.
1. Click on the “Friends” button to the right of their name at the top of the profile page.

2. Click “Add to another list”
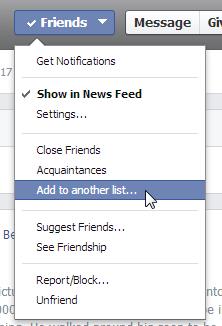
3. At the bottom, click on “New List”
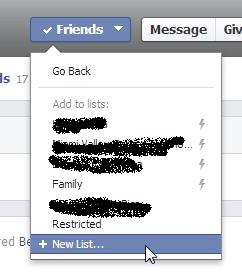
4. Now type in what you would like to name the list. For this example we will name it “Co-workers”.
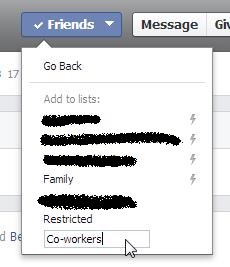
5. Press Enter to make the new list.
Awesome! Now you have made a new list and have added your first person to it. Now let’s continue by adding more people! You can do this in two ways. The first and (probably) easiest way would be to go to each person’s profile, clicking on the “Friends” button (like in step 1) and selecting either the “Co-workers” list (if it’s there) or by clicking on “Add to another list” and then selecting “Co-workers”.
The second way you could add people to the list is by going to the list itself and adding people from there. Here’s how to do that.
1. On your home screen, look on the left side of the page. Near the end of the column you should see a “Friends” section that contains the co-workers list. Click where it says co-workers (or whatever you named your list).

Now you are directed to a page where you see posts from the people on that list. On the right side you of the page, you will see a panel titled “On This List”. From there you enter your friends’ names into the “+Add friends to this list” once you start typing part of the name in Facebook should find that person, after Facebook finds that person hit enter or click on their name and you will now see that person’s profile picture above meaning they have been added to the list.
Okay so now we have added everyone we want to the list. Now let’s see how we can use these lists to post things to or even hide particular posts from this group.
Let’s say I have a picture that my co-workers will get but nobody else really would.

Let’s post this picture, but only to my co-workers.
1. Add the photo to the post as you normally would.
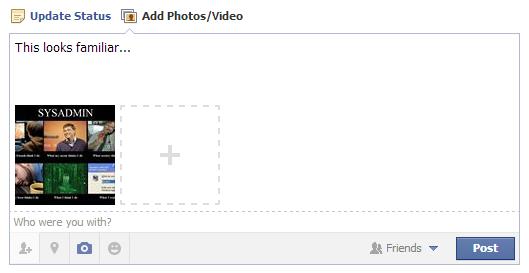
As you can see by the picture (click on it if you need to make it bigger) that right now this is going to post to all my friends. We don’t want that. Let’s change it!
2. Click on the “Friends” button next to the blue “Post” button.

3. On the drop-down menu. Click on the “Co-workers” list you see below (if you see it, proceed to step 6), if you do NOT see it click on “Custom” and continue with the next step.
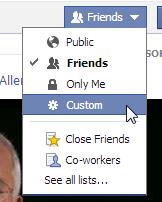
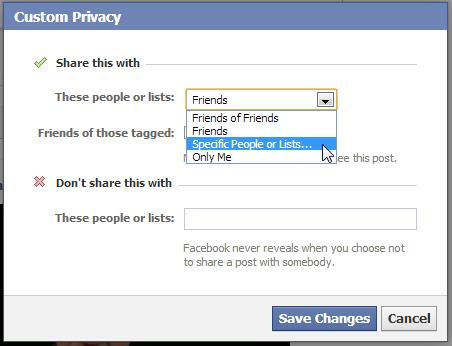
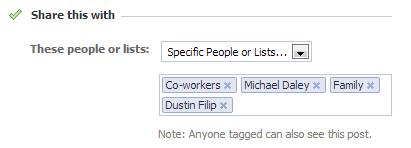
4. Click on the top drop-down menu and click “Specific People or Lists”.
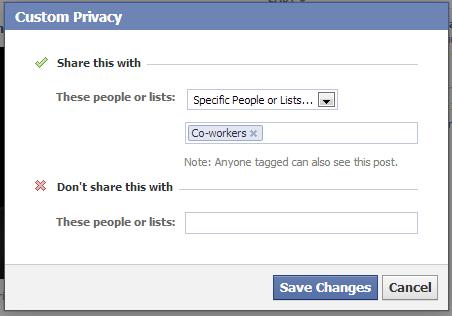
5. In the empty box that appears, type co-workers. Facebook will most likely find it after you type the first few letters so just click on it when Facebook finds it. Then click “Save Changes”.
6. Now you will return to your original post, notice now that the “Friends” icon has been replaced with  or
or  . Click “Post” and you’re done. You have successfully shared a status update with a particular group of people.
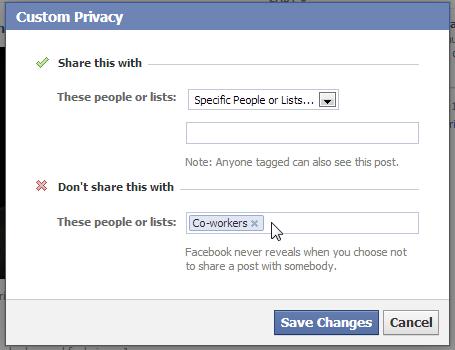
You could also do the opposite and hide particular people or lists from posting something. Instead of modifying the top part in step 5 you can choose “Don’t Share With” and enter particular people or lists. As shown below:
QUICK TIP:
1. You can use multiple lists or even lists and people to adjust visibility.
I hope this guide has helped you understand how lists can put you in control of the content the people in your social networks can see or even not see.
